
Social distancing and quarantine are terms we have become too familiar with lately. In the current pandemic situation, staying indoors and keeping a physical distance from people are the new normal. But stepping out for essentials is important and there is an unlikely hero that is saving lives every time you visit a grocery store- the humble Face Mask!
If you have been looking for a medical Face Mask in your local pharmacy and are unable to find any- worry not. We are here to share nifty DIY ideas that’ll help you get a face mask ready in minutes! The bonus? It’ll look cute, too!
Even if you do manage to get your hands on Face Masks (especially N-95 respirators), we implore you to leave them for our wonderful healthcare professionals who’re fighting tooth and nail to keep us all healthy.
Besides, a little DIY fun with family or friends is exactly what the doctor ordered. You’ll be creating something useful AND you’ll add one more skill to your arsenal. Win-win! And don’t worry, if sewing is not your thing, some hot glue will work just fine!
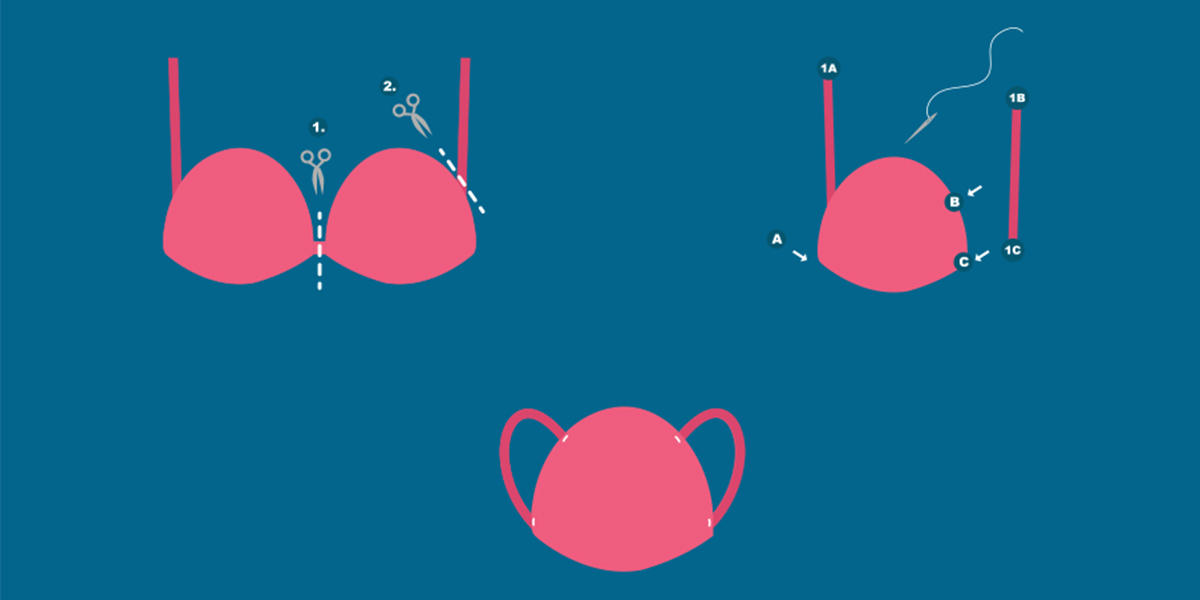
So, let’s start. Do you have an old Bra you have been meaning to discard? Hang on to it! Presenting the Bra Face Mask– a Zivame special!
Things you need:
- An old bra
- Needle & thread or hot glue
- Scissors
Method:
- Wash your bra in warm water ( add a few drops of Dettol) and iron it.
- Cut the cups out carefully, using the underwire area as a stencil.
- Draw two curved lines from one squared edge to the other, on the top and bottom part of the cup.
- Stitch the edges of the mask or hot glue them together so the fabric doesn’t separate from the foam cup.
- Cut two even pieces of the straps (they will act as the mask straps)
- Stitch or hot glue the straps in a “C” shape on to the squared edges of the mask.
- If you used hot glue, let it dry.
- Your Face Mask is ready to use!
Isn’t that super cool? This DIY idea is recycling at it’s best!
That’s not all, we have another nifty Face Mask idea that you can make into a DIY project:
Things you need:
- 1 Handkerchief or bandana
- 2 Hair ties
- 1 Paper napkin (extra layer of protection)
Method:
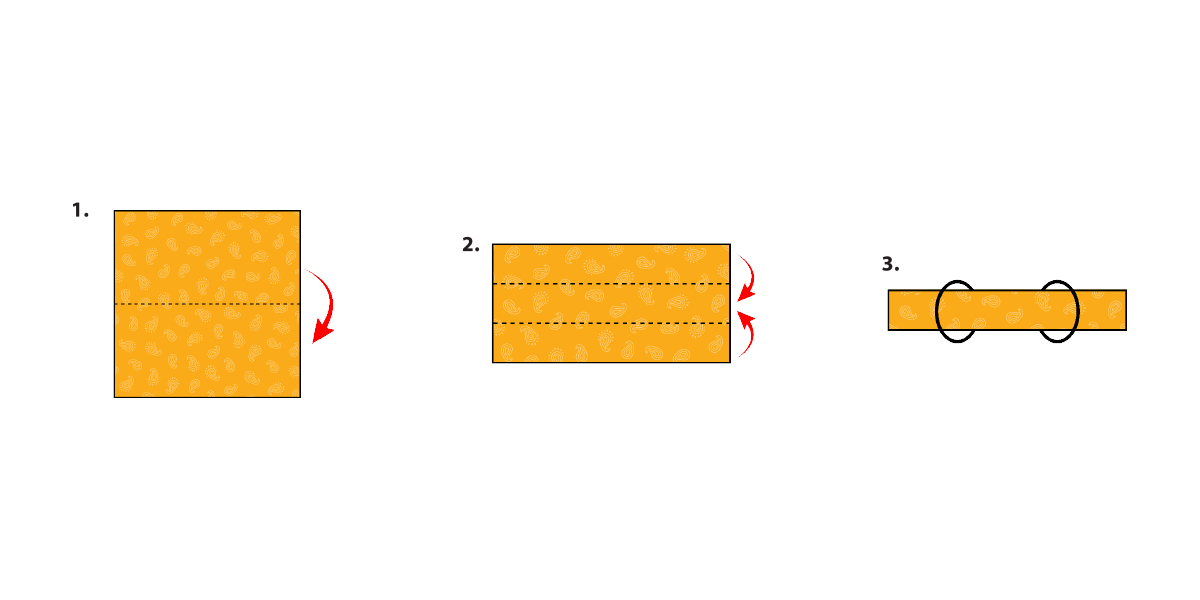
- Take your handkerchief and fold it twice horizontally. You will now have a long horizontal piece of cloth.
- Insert each end of the handkerchief inside two hair ties.
- Fold the ends towards the inside, so that they meet at the centre like two flaps.
- Take a paper napkin and place it inside the flaps.
- Your Face Mask is now ready!
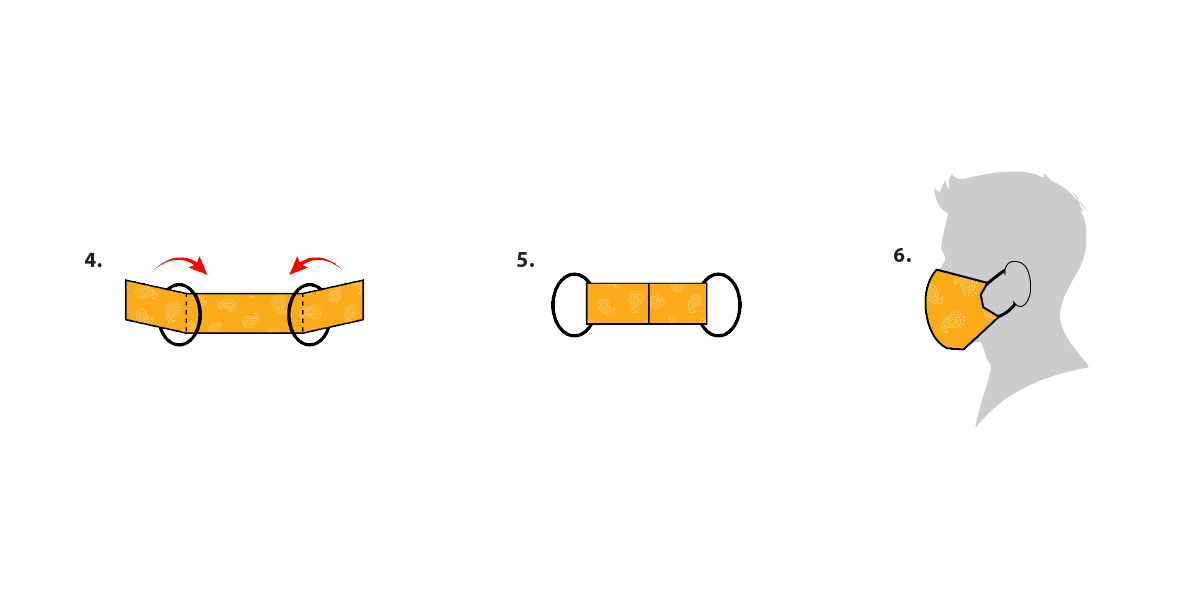
To wear the Face Mask, place the flap-side on your nostrils and mouth, covering both properly. Secure the hair ties on your ears. Now you’re ready to step out and get some grocery shopping done. We told you, it’s super simple!
Care Instructions & tips:
- Wash your Face Mask with a detergent after every use.
- Discard the paper napkin each time you use the Handkerchief Face Mask and replace it before heading out again.
- Maintain a physical distance of at least 6 feet between yourself and others when in a public place.
Ladies, try these easy DIY Face Masks and share this information with your friends and family. Use it whenever you step out of your house – but only when necessary. Let’s all do our bit and stay home, stay safe and help save lives.
Team Zivame
As the festival season beckons, get ready to look your best at the festive party. Everybody wants th

You can see it happen right in front of your eyes – the magic of nature! With the eco-friendly

Panties come in various shapes and sizes; so, when it comes to choosing the best fit for you, having